Inbound & Digital Marketing Blog

Volusion Access for HubSync Setup

Posted by Clarke Bishop

July 29, 2013

Volusion_Icon2

HubSync requires that we add some small amounts of javascript code to certain pages. In most cases we add the code to Article 101 (Add To Cart) and Article 130 (Order Finished).

We also require that the latest HubSpot tracking code be correctly installed in Volusion. 

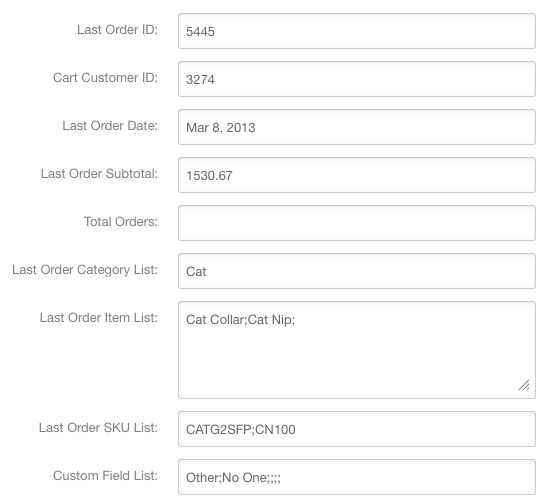
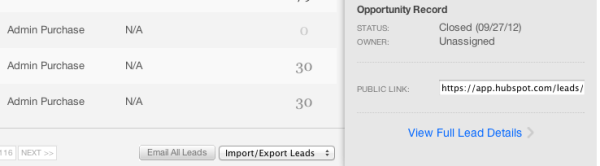
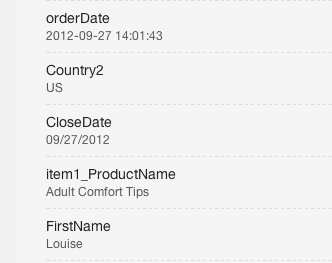
The final thing we need is API access to retrieve orders and send the data into HubSpot.

Volusion Permissions

Volusion allows you to set very specific permissions, and it's not always clear what each setting does. If anything is missing, we'll have to ask you to add that permission. For convenience, here is the list of permissions we need:

  • Products
  • Customers
  • Orders
  • Articles
  • Import
  • Export
  • File Editor
  • API

Details on each permission are shown below in a table copied directly from Volusion. The permissions we need are highlighted in orange. 

By default, your store has a primary administrator account – known as the Super Admin – which is typically assigned Customer ID #1 within your Customers database table. The Super Admin has access to every portion of your store.

Note that customer accounts can only be granted administrator access by a Super Admin.

Database Tables

Products Ability to view/edit Products, Options, Option Categories, Warehouses, and In-Stock Requests.
Product_Keys Ability to view/edit Product Keys and Product Key Distribution.
Discounts Ability to view/edit Coupons / Discounts.
GiftCards Ability to view/edit Gift Certificates.
Customers Ability to view/edit Customers Accounts (non-Administrator accounts), including customer passwords. This Access Key is also a prerequisite for the following Access Keys: CRM System, Accounts, Administrators, Affiliates,and LoginAsCustomer.
LoginAsCustomer Ability to login as a customer.
Reviews Ability to view/edit Customer Reviews.
Affiliates Ability to view/edit Affiliates (system settings) and Affiliate Stats.
ConfigSetup Ability to view/edit Config Variables, Company, SEO and Product Display Settings.
PaymentMethods Ability to view/edit settings on the Payment page. This Access Key is also a prerequisite for the Credit / Debit Cards Access Key.
Vendors Ability to view/edit Vendors.
POs Ability to view/edit Purchase Orders.
Orders Ability to view/edit Orders, Phone Orders, Recurring Billing, Returns / RMAs andAbandoned/Live Carts. Allows the use of the Point of Sale system. This Access Key is also a prerequisite for the Credit / Debit Cards Access Key.
Credit / Debit Cards Ability to view/complete Credit / Debit Card / eCheck details of an Order. Note that due to PCI/CISP compliance regulations, no administrator will ever have access to view a customer's full credit card number.
Articles Ability to view/edit articles (Site Content) and the Knowledge Base.
Newsletters Ability to view/edit Newsletters.
Categories Ability to view/edit Categories (including subcategories).
Specials Ability to view/edit Nav Menu Promotions.


Admin Area Sections

Import Ability to use Data Import tool.
Export Ability to use Data Export tool. This Access Key is also a prerequisite for theAPI Access Key.
AdminHistory Ability to view Admin History table.
File Editor Ability to view/edit Templates, Custom Fields, IP Firewall and File Editor. TheFile Editor give access to change website colors and edit HTML and CSS files. This Access Key is also a prerequisite for the BrandingImages (Logos) Access Key.
Inventory Ability to prepare shipments and receiving at Receiving and view/edit Search Terms.
ShippingMethods Ability to view/edit/test Shipping Methods in Shipping. This Access Key is also a prerequisite for the Locations Access Key.
Locations Ability to view/edit Locations (Edit Countries/States/Provices in Shipping) andCurrency.
Tax Ability to view/edit tax rates and settings in Tax.
ROITracker Ability to view/edit ROI Tracking.
StoreStats Ability to view/generate reports at Reporting and view graphs/statistics on theDashboard.
WebsiteDesign Ability to view/edit styles and settings in Navigation Menu.
BrandingImages Ability to view/edit Logos.
Maintenance Ability to open/close the store and use tools in Maintenance.
Administrators Ability to create/edit Administrators and update Access Keys. Note that having the Access Key of Customers gives you the ability to view theAdministrators table, but you will not have the ability to open or edit any records until this Administrators Access Key is checked.
Volusion Social Ability to post from the Social page.
Deal of the Day Ability to create/edit deals in Deal of the Day.
Social Store Ability to modify settings in Social Store.
CRM Manager Ability to create/edit settings at CRM System.
API Ability to access/use Volusion API tools.
My Rewards Ability to modify settings at MyRewards.
Release Notes Ability to view Release Notes.

more

Topics: eCommerce


Announcing HubSync 3 eCommerce for HubSpot 3

Posted by Clarke Bishop

March 10, 2013

I am pleased to announce the release of HubSync 3!

We are in the process of updating all our current clients. New customers will be setup on the new version from the start.

HubSpot 3 was a major upgrade for HubSpot. Contacts, List, and Workflows all got major improvements.

And, HubSpot completely re-worked their software APIs. The changes caused us to re-think how a shopping cart integration should work, and we hope you really like the new version.

As before, HubSync continues to help you optimize marketing ROI for your eCommerce company:

  • Know which sources are converting to sales.
  • Recover sales from abandoned carts
  • Closed-loop eCommerce

At a high level, it still works like it did before. We monitor your shopping cart to detect when visitors are adding items to their shopping carts and when they complete a purchase.

Every few minutes, we analyze the data to see if there is a new events:

  • Completed Purchase - The visitor has put items into their cart, and checked out to complete their purchase
     
  • Abandonded Cart - The visitor added items to their cart, but then did nothing for at least 60 minutes, and never completed their purchase. We know if they are still putting thing into or taking things out of their shopping cart.

 What's New in HubSync 3

The main changes you'll see are in Contacts. We've added a new Property Group called HubSync Information. All of these work just like any other HubSpot contact field.

hubsync3-contact-fields

For the most part, these fields contain the information from the Last, most recent, order.

The fields are:

  • Last Order ID - The shopping cart order ID for the last order. Use this if you ever want to lookup the order in the cart or cross-reference orders.

  • Cart Customer ID - The customer ID in the shopping cart. Again, it lets you cross-reference contacts.

  • Last Order Date - Date of the last order.

  • Last Order Subtotal - For the last order, the sub-total before taxes or shipping. 

  • Total Orders - A field you can use to track the total number of orders for this contact.  This requires setting up a workflow. I'll tell you how in another blog post.

  • Last Order Category List - (Depends on your specific shopping cart.) Where available, we put the product category list from the last order. Categories are separated by semicolons (;).
     
  • Last Order Items List - A list of the items from the last order separated by semicolons (;).

  • Last Order SKU List - A list of the SKUs for each item in the last order separated by semicolons (;).
     
  • Custom Field List - (Depends on your specific shopping cart.) Where available, we put a list of custom fields from the last order separated by semicolons (;).

Besides this information, we also update other standard contact fields like name, address, city, state, company, etc. All of this is much cleaner for HubSpot 3 than with the old version of our software. 

Those of you who are more advanced in HubSpot 3 may already see ways to use this new information. I'm also going to show you some tricks in future blog articles. 

New Forms

We also added new HubSpot 3 forms to support the new capabilities in HubSync3. 

The old version of HubSync used forms with names like "Completed Purchase." To keep things clearn, all the new conversion look like this: Completed Purchase (HubSync 3).

Some of you may have the new Forms interface. Whether you do or not, it's very important that you not edit these forms or use them for anything other than HubSync.


I hope you like the changes. Leave a comment to let me know what you think!

more

Topics: Conversion, eCommerce, Marketing Automation


How to Know Your Buyer Persona

Posted by Devine Mae Loredo

October 17, 2012

A buyer persona is a detailed profile of an example buyer that represents the real audience – an archetype of the target buyer. Marketers can use buyer personas to clarify the goals, concerns, preferences and decision process that are most relevant to their prospective customers. Your buyer persona is the representation of your prospects. Being sensible to the wants and needs of your potential customers and clients will give you the opportunity to give them better service.

flickr-6176507620-hd-resized-600

By knowing your buyer persona, you can render your prospects with the best marketing experience by offering them the right products and services at the right time. Imagine how effective marketers could be if we would all stop making stuff up and start aligning our messages and programs with the way real buyers think.


In creating your buyer persona, you’ll need to gather the general information of name, age, gender, profession and financial situation that will give you background information to establish which category this persona would fall into. This information will begin to tell you what your buyer persona prioritizes, thus helping you understand what influences their buying decision. Their profession and financial situation will tell you how fast they can decide on buying your products and services and how capable they are of purchasing them.

The next thing you’ll want to do is understand your persona’s demographics and characteristics. The demographics shows your buyer persona’s social standing and the characteristics will tell you what kind of products and services this persona would commonly purchase. With that in mind, you’ll need to gather information on their purpose, education, free time, buying decision and /shopping habits. Knowing how well your buyer persona understands the products and services your company offers, and the purpose of the product to them, will give you the idea on how you can market your products and services effectively.

When you have detailed your buyer personas, you can now use them in your marketing. Here are just a few ways:

  1. Address specific people. When you know your buyer, you can talk to him/her directly. You don’t have to say, “you” when you can say, “25-year old man, living in the suburbs”.
  2. Address specific problems. Talking about a specific problem is more engaging than a general problem. But it only works if you address a problem your buyers have, so you need to know your buyer personas first.
  3. Address specific beliefs. You can create a feeling of being talked directly at with beliefs. For example, “This product is healthy.” is less engaging than, “Your children need more vitamins that the school system doesn’t provide.”
  4. Pinpoint accurate placement. Placement is a key to effective marketing. When you understand your buyer personas, you know where they are, and how to reach them at the right time.
  5. Showcasing the right price range. If you market a product a buyer cannot afford, they won’t buy it. And they’ll be left with a belief that you’re over priced for them.


Also, by knowing your buyer persona you can address particular people with distinct problems and different beliefs. Most buyers want a more personal relationship with you the company. You have the responsibility to give them that feeling of importance and value as a customer and client, while helping you establish a stronger, trusted and honest relationship with your prospects and buyers.

Your marketing campaigns will be more successful through better buyer personas. Write content that is relatable by understanding the wants and needs of your prospects through your buyer personas. By posting content that is relevant and purposeful for them, you’ll generate loyal customers.

Photo Credit: thisiscris.com

more

Topics: Inbound Marketing, Sales & CRM, eCommerce


HubSpot 3 and HubSync Shopping Cart Integrations

Posted by Clarke Bishop

September 27, 2012

HubSpot 3 provides some great new features, and HubSync users may want to get a head start. We are considering some HubSync upgrades to better use the new Contacts functions. But, we won't be able to roll these out until HubSpot completes their migration (The latest estimate is February, 2013).

In the meantime, here are some things you can do. HubSync sends relevant data from orders into HubSpot. However, HubSpot won't let you use the data to build Smart Lists unless you do a few more steps.

First, there's a little homework. You need to identify the data you need. You can see the actual form submission data by going to:

https://app.hubspot.com/leads/app/list?portalId={Your Portal ID}

You have to lookup your portal ID and enter it after the "=" sign.

This will bring up the old HubSpot leads screen. Pick one of the leads submitted by HubSync. You can tell because the Event will be set to Completed Purchase, Abandoned Cart, or Admin Purchase.

Then, click View Full Lead Details > on the lower right.

hubsync-opportunity-record-resized-600

Click the Form Data tab, and you can see all the data the HubSync sent into HubSpot for each Event. You'll see all the data like this:

hubsync-order-data

Notice that for this order, Louise bought some Adult Comfort Tips. Now, here's what you can do to better use this information in the new Contacts area of HubSpot 3.

Go back to the main Contacts screen. Look for Manage Settings on the lower right.

hubspot-manage-settings

Click the Blue Create Property button. Then copy the name of the data from the old leads form. For example, you might want to make a new property called item1_ProductName to hold the data for the first product purchased.

Normally, you can just leave these in the Contact Information group, and leave the input set to Single Line Text.

hubspot-contacts-create-new-property

An easy way to do this is to have two tabs open in your browser — One for the new Contacts settings and another for the old Leads form data. Then, you can just cut and paste the names.

Now the new property is available to build Smart Lists and for other HubSpot 3 features!

This all works well for a lot of situations. Still, there are some limitations in HubSpot 3, and there's been some discussion about this on the HubSpot developer list lately.

There is currently no way to add multiple orders to HubSpot. So, if you have customers who make second and third purchases, item1_ProductName will contain the first item the customer last purchased. There is no way to have a complete history. We have some ideas for how to address this situation, but it is a difficult problem.

For a given order, we do submit data for multiple items purchased in a single order. You may see item1, item2, item3, etc. It's just that with a repeat order any new data will replace the old.

I hope this helps! If you have ideas or requests, please leave a comment.

more

Topics: Inbound Marketing, eCommerce, Marketing Automation


Custom Order Fields in Infusionsoft

Posted by Clarke Bishop

March 12, 2010

Greased Skid Marketing is now part of Inbound Team --The Atlanta, Georgia Inbound Marketing Agency specializing in helping businesses grow with online marketing.

Here's how you can add custom order fields to the Infusionsoft shopping cart!

  1. Go to Setup -> Misc. Settings. Under Application Settings, you'll see a section called Custom Fields. Make sure you select Order from the drop down before clicking Go.
  2. Add the custom field you want. Be sure to select the appropriate field type as this will affect the searches you can do later on.
    customfield
    Custom Field Screen
  3. Click View the field database names (for the API). Write down or print out the "Database Name." You'll need this later on. For example, the name of my Test field is Test1. These names are case-sensitive, so make sure you capture the name exactly!
  4. Now, go to Setup -> Shopping Cart and select Theme Gallery. The edit your current theme. Click the HTML Sections tab, and then click the Edit button for Area 1. Enter the HTML code for your custom field like this:
    <input name="Order0_Test1" id="Order0_Test1" type="text" value="Test Order Data"/>
    Notice that you have to put Order0_ in front of the database name. That's the word, "Order" followed by a zero and an underscore. You should have this in both your name and id attributes.
    Click Save.
  5. Click Back to Theme Gallery and click Live Preview. You should see your store front. Add a product to the cart and click Checkout. You'll see your custom fields in Area1 above the Billing Information.
    shoppingcart
    Shopping Cart with Custom Fields
  6. Now, pay for the order. Here's a good trick. Under Shopping Cart, Payment Options, select the checkbox for payment by check. Then, when you're testing, you can just click the pay by check option in your shopping cart. You don't actually have to pay for the order this way!
  7. Finally, go to Orders -> Find Orders ..., and lookup your new order.  You'll see a Custom Fields tab. Click that, and you'll see your order complete with the custom field data.
    orderscreen
    Order Screen with Custom Fields

I hope this is helpful. Leave a comment below with any questions or to let me know how this works for you!


more

Topics: Infusionsoft, Sales & CRM, eCommerce


Infusionsoft Shopping Cart & Storefront Review

Posted by Clarke Bishop

March 8, 2010

Greased Skid Marketing is now part of Inbound Team --The Atlanta, Georgia Inbound Marketing Agency specializing in helping businesses grow with online marketing.
NOTE: This post is one section of an extensive review of Infusionsoft.

Infusionsoft Shopping Cart & Storefront Overall Grade: D

The shopping cart and storefront are some of the worst parts of Infusionsoft!

  • The customization options are limited
  • The product pages are not SEO optimized
  • The shipping options are limited, and you can't integrate with Fedex or UPS.
  • It's not a good fit if you have very many products

Maybe I'm being too hard in some ways. If your needs are very basic, the shopping cart does work. It's a good fit for you if:

  • You have relatively few products and product categories
  • You are not picky about the branding for your online store
  • You can use simplified shipping options

I think Infusionsoft is aware that their Shopping Cart & Storefront is a big weakness, and they have oriented their marketing toward their strengths in email marketing, follow-up, and automation. It's a shame, really. It's really great to be able to do marketing follow-up based on products purchased, etc.

The limits of Infusionsoft's shopping cart has been good for GreasedSkid, though. We do a lot of project that integrate Infusionsoft with third-party shopping carts like Volusion.

more

Topics: Infusionsoft, Sales & CRM, eCommerce